Quick & Easy No Bake Peanut Butter Oat Cups: Your New Favorite Snack
Are you constantly on the hunt for that elusive sweet treat that checks all the boxes: quick to make, incredibly easy, and undeniably delicious? Look no further! These
no bake peanut butter oat cups are about to become your culinary obsession. Forget the oven, these delightful morsels come together with just a few simple ingredients and minimal effort, delivering a creamy, wholesome, and utterly satisfying snack experience. Whether you’re an avid peanut butter enthusiast, a chocolate lover, or simply seeking a hassle-free, homemade pick-me-up, these cups are designed to hit every sweet spot. Get ready to indulge in a treat that perfectly blends the nostalgic flavors of a classic peanut butter cup with the wholesome goodness of oats.
Why You'll Fall in Love with No Bake Peanut Butter Oat Cups
The allure of these
no bake peanut butter oat cups extends far beyond their delicious taste. They embody convenience, versatility, and a touch of wholesome indulgence, making them an ideal choice for nearly any occasion.
*
Effortless Preparation: The biggest draw is right in the name –
no bake! This means no preheating ovens, no waiting for things to bake, and a much cleaner kitchen experience. They're perfect for those scorching summer days when turning on the oven is unthinkable, or for when you simply need a quick fix without the fuss.
*
Speedy Satisfaction: From start to finish, these cups can be assembled in under 20 minutes, with most of the waiting time being passive chilling. This makes them ideal for last-minute cravings, impromptu gatherings, or whipping up a batch of snacks for the week ahead.
*
Wholesome Goodness: While undeniably a sweet treat, these cups pack a more nutritionally robust punch than many store-bought alternatives. They’re built on a foundation of whole grain oats, providing fiber, and protein-rich peanut butter, offering sustained energy. As a Registered Dietitian might attest, while all foods fit into a balanced diet, it's always "fun to make a sweet treat that has a little bit more going on nutritionally sometimes."
*
Kid-Friendly & Allergy-Conscious (with modifications): Their simple ingredient list and familiar flavors make them a huge hit with kids. Plus, with simple swaps (like gluten-free oats or sunflower seed butter for peanut butter), they can be adapted to suit various dietary needs.
*
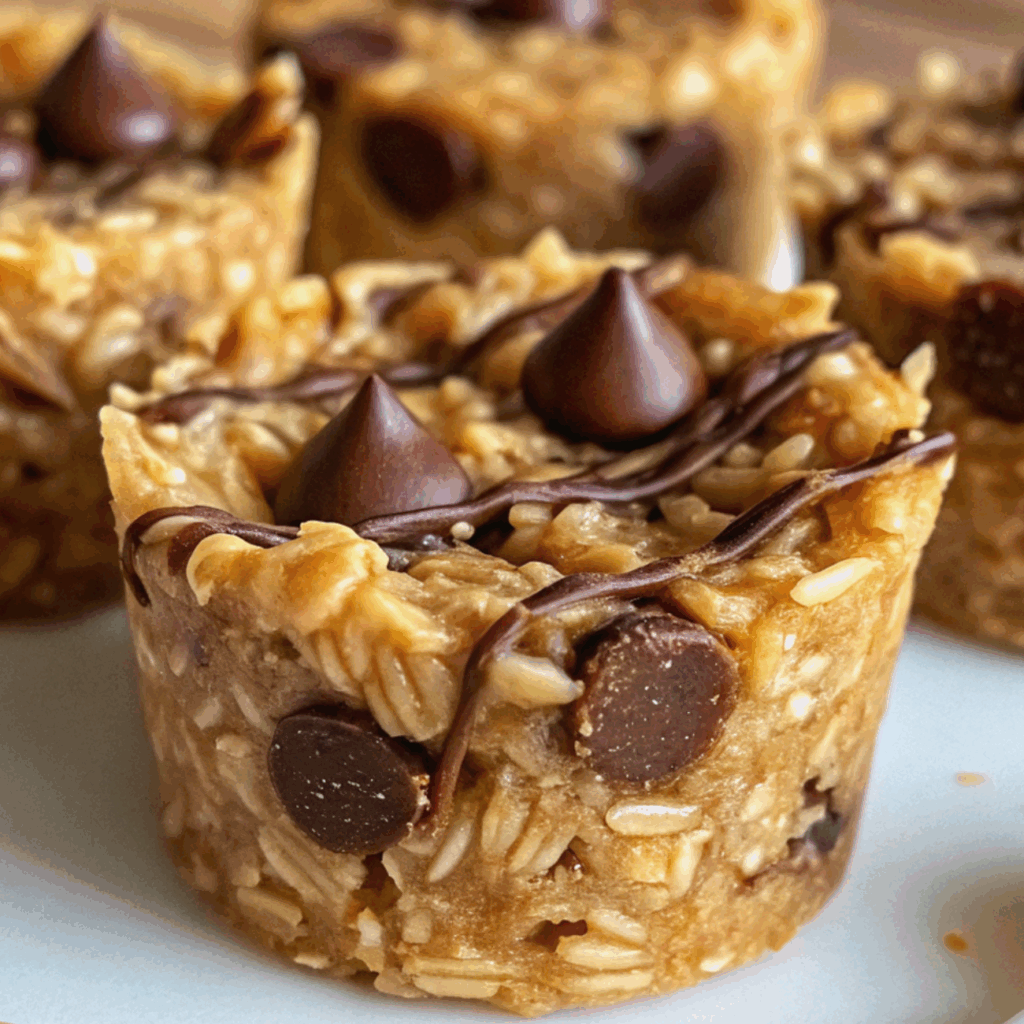
Irresistible Flavor Combination: Is there anything more iconic than peanut butter and chocolate? These cups perfectly marry the rich, nutty notes of peanut butter with a luscious, melting chocolate topping, creating a truly decadent experience that tastes far more indulgent than it is. Each bite offers a satisfying contrast of textures and flavors – creamy, chewy, and exquisitely sweet.
The Essential Ingredients for Your Perfect No Bake Peanut Butter Oat Cups
Creating truly spectacular
no bake peanut butter oat cups starts with understanding the role each ingredient plays. While the recipe calls for just a few staples, quality and preparation make all the difference in achieving that perfect texture and taste.
-
Rolled Oats: The backbone of our cups! Using finely processed oats is absolutely crucial for the structural integrity of these cups. Instead of whole oats that might crumble, pulsing them into a fine "oat flour" ensures they bind beautifully with the wet ingredients, creating a firm yet tender base that holds its shape without falling apart. A food processor is ideal for this, but a high-powered blender can also work wonders. The goal is a powdery consistency, not a sticky paste.
-
Peanut Butter: This provides the creamy texture, the rich nutty flavor, and a dose of protein. While creamy peanut butter offers a smoother, easier-to-mix consistency, don't shy away from chunky if you adore an extra textural crunch in your treats. Opting for natural peanut butter (just peanuts and salt) can offer a purer flavor and less added sugar, but any creamy variety you love will work beautifully.
-
Maple Syrup: Our natural sweetener of choice, maple syrup does more than just add sweetness. Its inherent stickiness acts as a vital binder, helping to hold the oats and peanut butter together. It also imparts a subtle, complex depth of flavor that plain granulated sugar simply can't match, keeping the cups moist and tender. For those looking for alternatives, agave nectar or honey can be used, though honey has a distinct flavor that might alter the overall profile slightly.
-
Chocolate Chips: The crown jewel! A good quality chocolate chip makes all the difference for that irresistible topping. Semi-sweet chips are a classic choice, offering a balanced sweetness, but feel free to experiment with dark chocolate for a richer, less sweet topping, or even milk chocolate for ultimate indulgence.
-
Coconut Oil (Optional but Highly Recommended): While technically optional, a small amount of coconut oil blended with your chocolate chips works magic. It helps the chocolate melt into a silky-smooth consistency, making it incredibly easy to spread. More importantly, it aids in setting the chocolate topping firmly and gives it a beautiful, glossy sheen once chilled, preventing it from cracking. For a deeper dive into ingredient nuances, check out our guide on Wholesome 4-Ingredient No Bake Peanut Butter Oat Cups Recipe.
Crafting Your Own No Bake Peanut Butter Oat Cups: A Step-by-Step Guide
Making these
no bake peanut butter oat cups is a breeze, but a few pro tips can ensure your results are consistently perfect.
-
Step 1: Transform Your Oats into Flour. Begin by placing your rolled oats into a food processor. Pulse them vigorously until they resemble a fine, powdery flour. This is arguably the most crucial step for achieving the desired texture and structural integrity. If your oats aren't fine enough, your cups may be crumbly. If you don't have a food processor, a high-speed blender can also do the trick – just be careful not to over-process into a sticky butter.
-
Step 2: Warm and Whisk the Peanut Butter & Maple Syrup. In a microwave-safe bowl, combine your peanut butter and maple syrup. Heat them gently for about 40-60 seconds, or until they are warm and pliable but not boiling. Stir the mixture well until it's completely smooth, silky, and thoroughly combined. This warm, fluid consistency will create the perfect binder for your oat base.
-
Step 3: Combine Oat Flour and Peanut Butter Mixture. Gradually add your freshly processed oat flour to the warm peanut butter and maple syrup mixture. Using a sturdy spoon or spatula, fold and mix until everything is thoroughly combined. This step might require a bit of muscle, as the mixture will be thick. The final consistency should be dense, moldable, and sticky, not dry or crumbly. If it seems too dry, add a tiny splash more maple syrup or peanut butter; if too wet, a teaspoon of extra oat flour can help.
-
Step 4: Prepare Your Muffin Pan. Line a standard 12-cup muffin tin with cupcake liners. Silicone muffin pans or liners are also fantastic as they allow for effortless removal. Skipping liners can lead to sticky situations and difficult extraction, potentially damaging your beautiful cups.
-
Step 5: Fill and Press the Cups. Divide the peanut butter oat mixture evenly among the prepared muffin cups. Using your fingers, or the back of a small spoon or even a shot glass, press the mixture down firmly into each liner. Compacting the base is essential for the cups to hold their shape once chilled and removed.
-
Step 6: Melt the Chocolate Topping. In a separate microwave-safe bowl (or using a double boiler), combine your chocolate chips and coconut oil. Microwave in 30-second intervals, stirring well after each, until the chocolate is fully melted and smooth. Alternatively, melt over a double boiler for a gentler, more controlled melt.
-
Step 7: Top and Chill. Spoon the melted chocolate evenly over each peanut butter oat base. Give the muffin tin a gentle tap on the counter to help the chocolate settle smoothly. Now comes the hard part: resisting the urge to eat them immediately! Place the muffin tin in the refrigerator for at least 30-60 minutes, or in the freezer for 15-20 minutes, until the chocolate topping is completely set. For more detailed instructions and expert advice, be sure to check out Master No Bake Peanut Butter Oat Cups: Easy Recipe & Pro Tips.
Tips & Tricks for Next-Level No Bake Peanut Butter Oat Cups
While the basic recipe is foolproof, a few extra insights can elevate your
no bake peanut butter oat cups from great to absolutely extraordinary.
*
Customization Galore:
*
Mix-ins for the Base: Before pressing the oat mixture into the muffin tin, consider folding in a handful of mini chocolate chips, chopped nuts (like pecans or almonds), shredded coconut, chia seeds, or even a dash of cinnamon for added flavor and texture.
*
Creative Toppings: After spooning on the chocolate, sprinkle with a pinch of flaky sea salt (highly recommended to enhance the chocolate-peanut butter synergy!), a few crushed peanuts, a drizzle of white chocolate, or some colorful sprinkles for a festive touch.
*
Storage Savvy: Store your finished cups in an airtight container in the refrigerator for up to a week. For longer storage, they freeze beautifully for up to a month. Just pop them out of the freezer a few minutes before serving to let them soften slightly.
*
Dietary Adaptations:
*
Gluten-Free: Ensure you use certified gluten-free rolled oats.
*
Nut-Free: Substitute peanut butter with sunflower seed butter (SunButter) or almond butter for a different flavor profile.
*
Vegan: The recipe is naturally vegan! Just ensure your chocolate chips are dairy-free (many dark chocolate varieties are).
*
Reduced Sugar: Opt for sugar-free maple syrup alternatives, but be mindful that the consistency and binding power might vary.
*
Troubleshooting Common Issues:
* **Crumbly Base:** This almost always means your oats weren't processed finely enough, or your wet-to-dry ingredient ratio is off. Add a tiny bit more warm peanut butter or maple syrup until the mixture is cohesive.
* **Sticky Base:** If your base is too wet to handle, add a tablespoon of extra oat flour at a time until it reaches a moldable consistency.
* **Chocolate Not Setting Firmly:** Ensure you used coconut oil, and allow ample chilling time. Sometimes ambient humidity can affect setting; a freezer chill often resolves this.
Conclusion
These
quick & easy no bake peanut butter oat cups are more than just a recipe; they're a testament to how simple ingredients can come together to create something truly magical. They offer the perfect blend of speed, simplicity, and satisfying flavor, making them an indispensable addition to your snack repertoire. Whether you're fueling a busy afternoon, craving a wholesome dessert, or simply indulging your love for the classic peanut butter and chocolate combination, these cups deliver every time. So go ahead, whip up a batch today, and discover why these delightful treats are destined to become your new favorite go-to snack!