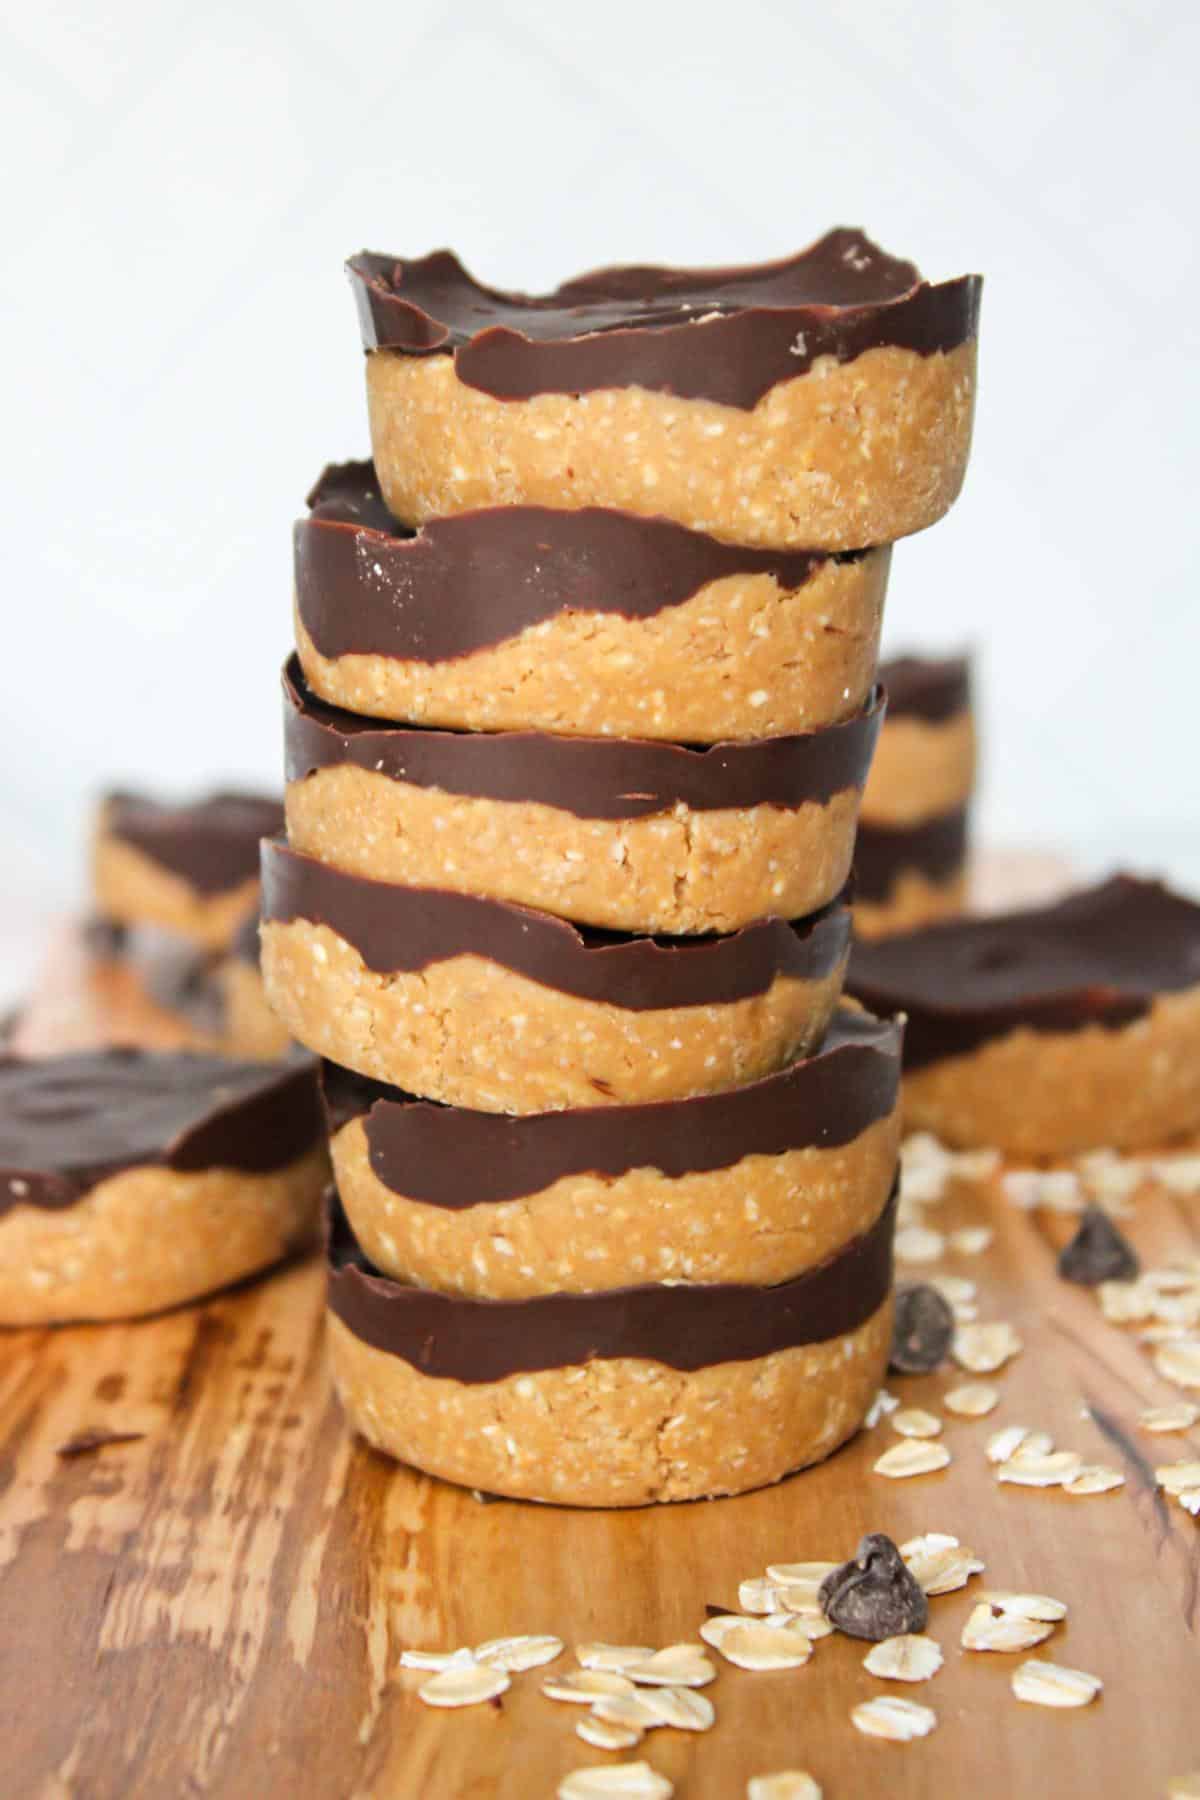
Are you on a quest for that elusive sweet treat that doesn't demand hours in the kitchen, a hot oven, or a long list of obscure ingredients? Look no further! Our recipe for wholesome 4-ingredient no bake peanut butter oat cups is about to become your new kitchen obsession. Imagine the perfect blend of creamy peanut butter, nutritious oats, and a luscious chocolate topping, all without ever turning on your stove. These delightful cups are not just incredibly easy to make; they’re also a fantastic, guilt-free way to satisfy your sweet tooth, perfect for an afternoon energy boost or a wholesome dessert.
I’ve personally found these no bake peanut butter oat cups to be an absolute lifesaver when cravings hit, offering that delightful balance of indulgence and nourishment. They deliver big on flavor and texture, reminding you of a classic peanut butter cup but with the added goodness of whole grains. So, if you're ready to whip up a batch of these simple, delicious, and incredibly satisfying treats, stick around for my tried-and-true method and a few extra tips to ensure they turn out perfectly every single time.
Why These No Bake Peanut Butter Oat Cups Are a Must-Try
Beyond their undeniable deliciousness, there are countless reasons why these no bake peanut butter oat cups deserve a permanent spot in your recipe collection. First and foremost, the "no bake" aspect is a game-changer. Especially on hot days or when you simply don't have the time or inclination to use the oven, these cups offer a convenient solution. The preparation is minimal, making them an ideal project for busy weeknights or even for involving little helpers in the kitchen.
What truly sets these apart is their wholesome profile. While they taste incredibly indulgent, they're crafted with simple, nourishing ingredients. As a Registered Dietitian might attest, it’s wonderful to enjoy a sweet treat that also brings something beneficial to the table. We’re talking about whole-grain oats for fiber, protein-rich peanut butter for satiety, and natural sweetness from maple syrup. They offer a delightful alternative to highly processed snacks, proving that you don't have to abandon your sweet tooth to make more nutritious choices. Whether you're a devoted peanut butter lover or just seeking a quick, satisfying snack, the combination of creamy peanut butter and a decadent chocolate layer creates an irresistible flavor profile reminiscent of your favorite candy, but with a homemade, wholesome twist.
The Wholesome Four: Essential Ingredients for Your Oat Cups
The magic of these no bake peanut butter oat cups lies in their simplicity. Just four core ingredients come together to create a snack that's far greater than the sum of its parts. Each plays a crucial role in achieving the perfect texture, flavor, and nutritional balance. Let's break down the quartet:
- Rolled Oats: The foundation of our cups, rolled oats provide structure and a good dose of whole-grain fiber. The key here is transforming them into a fine flour. This step is non-negotiable for achieving a smooth, cohesive base that holds its shape without crumbling. Don't worry if you don't have oat flour on hand; your food processor or a high-powered blender can easily turn regular rolled oats into the perfect consistency.
- Creamy Peanut Butter: This is where the rich, nutty flavor and creamy texture come from. Peanut butter also contributes healthy fats and protein, making these cups surprisingly satisfying. While creamy peanut butter is generally recommended for a smoother consistency and easier mixing, don't shy away from chunky if you prefer an added textural element and a bit of crunch. Natural peanut butter (without added sugars or oils) is an excellent choice for a healthier profile.
- Pure Maple Syrup: Our natural sweetener and a vital binder. Maple syrup not only provides a subtle depth of flavor that's more nuanced than plain sugar but also helps keep the oat mixture moist and pliable. It's essential for achieving that perfect moldable, yet firm, consistency that allows the cups to hold their shape once chilled. Honey can be a suitable alternative if you prefer.
- High-Quality Chocolate Chips: The crowning glory! Melting chocolate chips creates that irresistible, hardened chocolate shell that makes these cups feel truly special. Opting for a good quality brand, whether dark, milk, or semi-sweet, will significantly elevate the overall taste. For an even smoother, glossier finish, a touch of coconut oil can be added when melting the chocolate, helping it set beautifully.
Crafting Perfection: A Step-by-Step Guide to Your No Bake Peanut Butter Oat Cups
Creating these delightful no bake peanut butter oat cups is a straightforward process. Follow these detailed steps to ensure your treats are nothing short of perfect:
Step 1: Preparing Your Oats for Success
The secret to a non-crumbly cup is finely processed oats. Begin by taking your rolled oats and pulsing them in a food processor or high-powered blender. Continue until they resemble a fine oat flour. This step is critical; it creates a consistent texture that will bind beautifully with the wet ingredients, allowing your cups to hold together flawlessly. Resist the urge to skip this, as coarsely ground oats can lead to a more brittle, less cohesive final product.
Step 2: The Silky Peanut Butter & Maple Syrup Base
In a microwave-safe bowl, combine your creamy peanut butter and pure maple syrup. Heat this mixture for about 40 to 60 seconds. The goal is to warm it just enough so that it becomes more fluid and easy to mix, not scalding hot. Once warmed, stir vigorously until the peanut butter and maple syrup are thoroughly combined into a silky, cohesive slurry. This warm, sweet, and creamy mixture will serve as the binder for your oat flour.
Step 3: Bringing It All Together: The Oat Mixture
Now, gradually add your prepared oat flour to the warm peanut butter and maple syrup mixture. Using a sturdy spoon or spatula, fold and mix until all the oat flour is fully incorporated. This might require a little elbow grease, but keep going until you have a thick, uniform dough-like consistency. The mixture should be pliable and moldable, not too dry or overly sticky. If it feels too dry, add a tiny splash (about ½ to 1 teaspoon) of extra maple syrup or peanut butter at a time until the desired texture is achieved. Conversely, if it seems too wet, a tablespoon of additional oat flour can help.
Step 4: Setting the Stage: Muffin Pan Prep
To ensure easy removal and a picture-perfect presentation, proper pan preparation is key. I highly recommend lining a standard 12-cup muffin tin with paper cupcake liners. Alternatively, a silicone muffin pan works wonderfully and usually doesn't require liners due to its non-stick properties. Skipping liners or a silicone pan can lead to cups sticking, making them difficult to extract cleanly.
Step 5: Shaping Your Delicious Cups
Using a spoon or a small cookie scoop, distribute the peanut butter oat mixture evenly among the prepared muffin cups. Then, with clean fingers or the back of a spoon, firmly press the mixture down into each cup. Compact it well, pushing it against the bottom and sides to create a sturdy, dense base. This firm packing is essential for the cups to maintain their shape once chilled and removed from the pan.
Step 6: The Decadent Chocolate Topping and Chilling
In a separate microwave-safe bowl, melt your chocolate chips. Heat in 20-30 second intervals, stirring well after each, until smooth and fully melted. If desired, stir in ½ to 1 teaspoon of coconut oil; this helps the chocolate melt more smoothly and set with a beautiful, glossy sheen. Once melted, spoon the warm chocolate evenly over each peanut butter oat base. For an extra touch, you can sprinkle a tiny pinch of sea salt on top of the melted chocolate for a delightful sweet and salty contrast. Now, transfer the muffin tin to the refrigerator and chill for at least 1-2 hours, or until the chocolate topping is completely set and the cups are firm. This chilling process is crucial for their structural integrity and optimal texture.
Tips & Tricks for No-Bake Peanut Butter Oat Cup Mastery
Elevate your no bake peanut butter oat cups from good to absolutely extraordinary with these practical tips and creative variations:
- Storage Savvy: Store your finished oat cups in an airtight container in the refrigerator for up to a week. They are also freezer-friendly! For longer storage (up to 2-3 months), freeze them individually on a baking sheet, then transfer to a freezer-safe bag. Thaw briefly at room temperature before enjoying.
- Texture Play: While processing oats into flour is key, for a slightly chewier texture, you can leave a small portion of the oats slightly coarser. Just ensure the majority is finely ground for binding.
- Flavor Boosters: A pinch of salt in the oat mixture can truly enhance the peanut butter flavor. For an added layer of complexity, try adding a tiny drop of vanilla extract to the peanut butter and maple syrup mixture in Step 2.
- Ingredient Swaps:
- Nut Butter Alternatives: Almond butter or cashew butter can be substituted for peanut butter if you have allergies or prefer a different flavor profile. Note that some nut butters might be oilier or thicker, so adjust liquid/oats slightly.
- Sweetener Options: While maple syrup offers a distinct flavor, honey can be used as a 1:1 substitute. For sugar-free alternatives, explore sugar-free syrups, adjusting to taste.
- Chocolate Varieties: Experiment with dark chocolate for a richer taste, milk chocolate for extra sweetness, or even white chocolate for a different aesthetic and flavor.
- Creative Toppings & Mix-ins: Before pressing the oat mixture, consider stirring in a tablespoon of chia seeds or ground flaxseed for an extra nutritional boost. Once the chocolate is melted, get creative with toppings: a sprinkle of flaky sea salt, crushed nuts, coconut flakes, or even colorful sprinkles can add visual appeal and extra flavor.
- Troubleshooting: If your mixture is too crumbly, it likely needs more moisture – add a tiny bit more maple syrup or peanut butter. If it's too sticky to handle, try chilling it briefly before pressing into cups, or add a tablespoon of extra oat flour. For more in-depth solutions and to truly Master No Bake Peanut Butter Oat Cups: Easy Recipe & Pro Tips, explore common pitfalls and how to avoid them.
- Kid-Friendly Fun: These are a fantastic recipe to make with children! They can help with measuring, pressing the mixture into the cups, and drizzling the chocolate. It's a fun, mess-friendly activity that results in a delicious snack. For more quick and easy ideas that become your new favorite, check out our guide on Quick & Easy No Bake Peanut Butter Oat Cups: Your New Favorite Snack.
With these insights, you're now equipped not just to follow a recipe, but to truly understand and personalize your no bake peanut butter oat cups, making them perfectly suited to your taste and dietary needs.
Conclusion
There you have it – a comprehensive guide to crafting delightful, wholesome 4-ingredient no bake peanut butter oat cups. This simple recipe proves that satisfying your sweet cravings doesn't have to be complicated or laden with artificial ingredients. With their rich flavor, pleasing texture, and straightforward preparation, these cups are destined to become a staple in your kitchen. Whether you need a quick energy bite, a healthy dessert alternative, or a fun project with the kids, these no bake wonders deliver every time. So go ahead, gather your ingredients, and treat yourself to the effortless joy of homemade goodness!
